F-PLUGは、電気製品の電気使用量、電気料金、CO2換算値だけでなく、周辺の温度、湿度、照度の測定センサーを備えた、Bluetooth接続型の測定ユニットです。
電力・温度・湿度・照度測定機能つきプラグ F-PLUG(エフプラグ)
本製品は、Windowsに対応した「F-PLUGユーティリティ」が用意されますが、今回、開発元の富士通ビー・エス・シー様のご協力により、OpenBlocks AX3/A6シリーズとの接続検証を行いました。
また、HTMLによるリソースモニタリングツールである、「munin」のpluginを作成し、環境モニタリングツールとしての活用例も紹介します。

OBDN技術ブログによる動作検証は、当社およびF-PLUG開発元において、デバイスの動作を保証およびサポートを行うものではありません。
また、F-PLUG製品は、現在Microsoft Windows7/Windows8に対応したソフトウェアのみが 用意されており、OpenBlocksを含むLinux製品との接続検証に対しては、制御データ形式 の一部のみの公開となります。
動作の保証、サポートなどは行っておりません。 内容に関するご質問、ご指摘などありましたら、ブログ記事の担当までご連絡下さい。
また、F-PLUG製品は、現在Microsoft Windows7/Windows8に対応したソフトウェアのみが 用意されており、OpenBlocksを含むLinux製品との接続検証に対しては、制御データ形式 の一部のみの公開となります。
動作の保証、サポートなどは行っておりません。 内容に関するご質問、ご指摘などありましたら、ブログ記事の担当までご連絡下さい。
<検証環境>
OpenBlocks AX3/4 Debian 6.0 kernel: 3.0.6
OpenBlocks A6 Debian 6.0 kernel: 2.6.31.8
1. ペアリング方法
OpenBlocksによる、Bluetoothアダプタの導入に関しては、
【.tested】Logitec製 Bluetoothアダプタ (LBT-UAN03C1BK) [AX3]
を参照して下さい。
また、現在β公開を行っている、Debian Wheezy 環境を使用する場合は、
[.tested] RATOC SYSTEM REX-BT60 [Debian Wheezy/Squeeze][AX3][A6]
を参考にペアリングを行ってください。ペアリングに、simple-agentコマンドを使用した場合、Confirm passkey (yes/no):と表示された時に、F-PLUGアダプタがペアリング要求を受け付ける状況になりますので、アダプタのペアリングボタンを押し、yesと入力して下さい。
ペアリングが完了します。
# /usr/share/doc/bluez/examples/simple-agent hci0 <BTADDR>
RequestConfirmation (/org/bluez/2001/hci0/dev_B0_99_28_A4_43_BB, 457589)
Confirm passkey (yes/no): yes
Release
New device (/org/bluez/2001/hci0/dev_B0_99_28_A4_43_BB)
RequestConfirmation (/org/bluez/2001/hci0/dev_B0_99_28_A4_43_BB, 457589)
Confirm passkey (yes/no): yes
Release
New device (/org/bluez/2001/hci0/dev_B0_99_28_A4_43_BB)
ペアリングの確認は以下のコマンドで行います。
# /usr/share/doc/bluez/examples/test-device list
dbus.Array([dbus.ObjectPath('/org/bluez/1453/hci0/dev_B0_99_28_A4_43_BB')], signature=dbus.Signature('o'))
dbus.Array([dbus.ObjectPath('/org/bluez/1453/hci0/dev_B0_99_28_A4_43_BB')], signature=dbus.Signature('o'))
2. rfcommによるSPP接続方法
本デバイスはSPPプロファイルに対応しており、OpenBlocksからデータをハンドリングするためには、rfcommにより仮想シリアルデバイスとして扱うのが簡単です。
今回のハンドリングデータはテキスト形式でなく、バイナリデータを含むため、-rオプション(rawモード)を追加します。
# rfcomm -r connect hci0 <BTADDR>&
/dev/rfcomm0が出来ているのを確認してください。
# ls -la /dev/rfcomm0
crw-rw---- 1 root dialout 216, 0 Feb 28 09:07 /dev/rfcomm0
crw-rw---- 1 root dialout 216, 0 Feb 28 09:07 /dev/rfcomm0
3. F-PLUGの制御データ形式について
制御データ形式、および、その説明は、以下のgithubのサイトを参照してください。
https://github.com/goto2048/fplug_for_linux
なお、今回公開される要求/応答データ形式は一部です。
公開されていない要求コマンドの中には、ファームウェア操作など本体設定に関わるものもあり、誤ったデータの送信により、本体が正常に動作しなくなる場合もあります。
利用される際は、送出するデータの設定に十分注意してください。
4. 通信テスト
本デバイスのデータハンドリングは、要求データの送出により、本体が処理を行い、そのステータスおよび計測値その他を返すシンプルなものです。
rfcommによる仮想シリアルデバイスを使用した、最もシンプルなハンドリングの例は以下の通りです。
この例では、温度取得要求を行い、応答データを16進表示します。
#include <stdio.h>
#include <sys/types.h>
#include <sys/stat.h>
#include <sys/ioctl.h>
#include <fcntl.h>
#include <termios.h>
#include <unistd.h>
#define SERIAL_PORT "/dev/rfcomm0"
unsigned char sm_req[]={0x10, 0x81, 0x00, 0x00, 0x0e, 0xf0, 0x00, 0x00, 0x11, 0x00, 0x62, 0x01, 0xe0, 0x00};
int main(int argc, char *argv[])
{
int fd;
int ret,cnt;
unsigned char buf[256];
struct termios oldtio, newtio;
fd = open(SERIAL_PORT, O_RDWR );
tcgetattr( fd, &oldtio );
newtio = oldtio;
newtio.c_cflag = B9600 | CS8 | CLOCAL | CREAD;
tcsetattr(fd, TCSANOW, &newtio);
write(fd, sm_req, sizeof(sm_req) );
ret=read(fd, buf, 256);
for ( cnt=0; cnt\<ret; cnt++ ) {
printf( "%02x,", buf[cnt] );
}
printf( "\n" );
tcsetattr(fd, TCSANOW, &oldtio);
close(fd);
return 0;
}
また、メニュー形式によるテストプログラムfptestのソースコードををgithubに置きました。
このプログラムにより温度、湿度、光量、リアルタイムの電力計測のデータハンドリングテストを行うことが出来ます。
本テストプログラムおよび、要求応答データ形式などのドキュメント、5項以降で使用する一連のプログラムは、以下の手順により入手してください。
# git clone https://github.com/goto2048/fplug_for_linux.git
fplug_for_linuxディレクトリ以下に本レポジトリが展開されます。
テストプログラムは、シンプルに以下の手順でビルドしてください。
# make fptest
なお、/dev/rfcomm0デバイスのアトリビュートが、初期値ではrw-rw---となっていますので、テストを行う場合、root権限で実行するか、 rfcomm0デバイスを、
chmod o+rw /dev/rfcomm0
するなどの対策をして下さい。
本テストプログラムにより、F-PLUGの初期化およびデータ取得が出来ることを確認しました。
5. muninによるモニタリング
Munin はネットワーク化に対応したリソース・モニタリングツールです。
F-PLUGも、簡単なpluginを作成するだけで監視対象に加える事が可能です。
・apache2およびmuninのインストールと初期設定
muninのモニタリング表示はhtmlを介して行うため、webサーバを用意します。
今回はapache2を使用しました。
# aptitude install apache2
続けてmuninをインストールします。
# aptitude install munin
今回、htmlの展開場所はデフォルトの/var/cache/munin/wwwのままで作業しました。
/etc/apache2/conf.dの下にmuninというファイルが追加されますので、これを編集します。
Allow from 以下に、アクセスを許可するIPアドレスを記述して下さい。
以下のサンプルでは、192.168.253.xxxからのアクセスを許可しています。
Alias /munin /var/cache/munin/www
<Directory /var/cache/munin/www>
Order allow,deny
Allow from localhost 192.168.253.0/24
Options None
# This file can be used as a .htaccess file, or a part of your apache
# config file.
#
# For the .htaccess file option to work the munin www directory
# (/var/cache/munin/www) must have "AllowOverride all" or something
# close to that set.
#
# AuthUserFile /etc/munin/munin-htpasswd
# AuthName "Munin"
# AuthType Basic
# require valid-user
# This next part requires mod_expires to be enabled.
#
# Set the default expiration time for files to 5 minutes 10 seconds from
# their creation (modification) time. There are probably new files by
# that time.
#
<IfModule mod_expires.c>
ExpiresActive On
ExpiresDefault M310
</IfModule>
</Directory>
apache2をrestartします。
# apachectl restart
なお、debian 6.0パッケージにより提供されるmuninのバージョンは1.4.5です。
今回、1.4.5での作業の後、2.0をセルフビルドして乗せ換えましたが、プラグインは手を入れずそのまま使用しています。
・muninの監視プラグインの追加および削除
munin-node-configureにより、プラグインのリストおよび状態を表示することが出来ます
# munin-node-configure
Plugin                     | Used | Extra information
------                     | ---- | -----------------
acpi                       | no   |
amavis                     | no   |
apache_accesses            | no   |
apache_processes           | no   |
apache_volume              | no   |
apc_envunit_               | no   |
apt                        | no   |
apt_all                    | no   |
bind9                      | no   |
bind9_rndc                 | no   |
bonding_err_               | no   |
buddyinfo                  | no   |
courier_mta_mailqueue      | no   |
courier_mta_mailstats      | no   |
courier_mta_mailvolume     | no   |
cps_                       | no   |
cpu                        | yes  |
cpuspeed                   | no   |
cupsys_pages               | no   |
df                         | yes  |
df_abs                     | no   |
df_inode                   | no   |
digitemp_                  | no   |
diskstat_                  | no   |
diskstats                  | no   |
entropy                    | no   |
exim_mailqueue             | no   |
exim_mailstats             | no   |
fail2ban                   | no   |
forks                      | no   |
fplug_humid                | yes  |
fplug_illum                | yes  |
fplug_rwatt                | yes  |
fplug_temp                 | yes  |
freeradius_acct            | no   |
freeradius_auth            | no   |
freeradius_proxy_acct      | no   |
freeradius_proxy_auth      | no   |
fw_conntrack               | no   |
fw_forwarded_local         | no   |
fw_packets                 | no   |
hddtemp_smartctl           | no   |
http_loadtime              | no   |
if_                        | yes  | eth0
        :
        :
プラグインは、/usr/share/munin/pluginsに記述されており、サーバ監視に必要なリソースモニタリング用のpluginはほぼ網羅されています。
監視を有効にしたいpluginは、/etc/munin/plugins下にシンボリックリンクされています。
obsa6:/etc/munin/plugins# ls -la
total 8
drwxr-xr-x 1 root root 4096 Mar 1 18:56 .
drwxr-xr-x 1 root root 4096 Mar 4 10:34 ..
lrwxrwxrwx 1 root root 28 Mar 1 15:35 cpu -> /usr/share/munin/plugins/cpu
lrwxrwxrwx 1 root root 27 Mar 1 15:35 df -> /usr/share/munin/plugins/df
lrwxrwxrwx 1 root root 36 Mar 1 18:56 fplug_humid -> /usr/share/munin/plugins/fplug_humid
lrwxrwxrwx 1 root root 36 Mar 1 18:56 fplug_illum -> /usr/share/munin/plugins/fplug_illum
lrwxrwxrwx 1 root root 36 Mar 1 18:56 fplug_rwatt -> /usr/share/munin/plugins/fplug_rwatt
lrwxrwxrwx 1 root root 35 Mar 1 18:42 fplug_temp -> /usr/share/munin/plugins/fplug_temp
lrwxrwxrwx 1 root root 28 Mar 1 15:35 if_eth0 -> /usr/share/munin/plugins/if_
lrwxrwxrwx 1 root root 29 Mar 1 15:35 load -> /usr/share/munin/plugins/load
lrwxrwxrwx 1 root root 31 Mar 1 15:35 memory -> /usr/share/munin/plugins/memory
lrwxrwxrwx 1 root root 34 Mar 1 15:35 processes -> /usr/share/munin/plugins/processes
lrwxrwxrwx 1 root root 31 Mar 1 15:35 uptime -> /usr/share/munin/plugins/uptime
lrwxrwxrwx 1 root root 30 Mar 1 15:35 users -> /usr/share/munin/plugins/users
obsa6:/etc/munin/plugins#
監視を無効にする場合は、このシンボリックリンクを削除してください。
今回は、F-PLUGのテストが目的ですので、監視対象を大幅に削除しています。
修正後、muninをrestartします。
# /etc/init.d/munin-node restart
・F-PLUG用モニタコマンドの作成
muninに監視データを渡すためのF-PLUG用データハンドラを作成します。
githubに置いた、fpstatus.cをコンパイルし、/usr/local/binの下にコピーしてください。
本プログラムはリアルタイムデータの要求/応答のみに特化したもので、上記のテスト用サンプルプログラムをベースに、応答データのステータスチェック、エラーリトライを加えています。
温度、湿度、照度、リアルタイム消費電力に対応し、コマンドラインオプション(-t,-h,-i,-w)により監視するデータを選択できます。
# make fpstatus
# cp fpstatus /usr/local/bin
# cp fpstatus /usr/local/bin
なお、munin-nodeは、muninユーザで実行されるため、rfcomm0デバイスはそのままでは使用出来ません。
chmod u+s /usr/local/bin/fpstatus
として、setuidするか、
chmod o+rw /dev/rfcomm0
として、rfcommデバイスにアクセス権限を付加する必要があります。
fpstatusのコマンドラインオプションは以下の通りです。
fpstatus [option]
-t, t 温度 (℃)
-h, h 湿度 (%)
-i, i 照度 (ルクス)
-r, r リアルタイム消費電力 (ワット)
-t, t 温度 (℃)
-h, h 湿度 (%)
-i, i 照度 (ルクス)
-r, r リアルタイム消費電力 (ワット)
・munin用fplugプラグインの作成
minin用のプラグインを作成します。
munin用プラグインは、以下の実行結果を出力することが出来るならば、何の言語で記述してもよく、他のプラグインを雛形にすると簡単に作成出来ます。
ただし、テストとしてプラグインの実行結果を単体で確認するためには、環境変数MUNIN_LIBDIRの設定が必要です。
# setenv MUNIN_LIBDIR=/usr/share/munin
プラグイン名をmunin_pluginとした場合、
munin_plugin autoconf
このプラグインが利用可能かどうかを返します。
このプラグインが正常に値を返せる状態かどうかをチェックし、yesかnoかを返します。
今回のサンプルでは、yesのみを返しています。
# ./fplug_temp autoconf
yes
yes
munin_plugin config
このプラグインの情報を出力します。
# ./fplug_temp config
graph_title fplug_temperature
graph_args --base 1000 -l 0
graph_scale no
graph_vlabel temperature
graph_category fplug
fplug_temp.label fplug_temp
fplug_temp.draw LINE2
graph_title fplug_temperature
graph_args --base 1000 -l 0
graph_scale no
graph_vlabel temperature
graph_category fplug
fplug_temp.label fplug_temp
fplug_temp.draw LINE2
munin_plugin
オプションなしで実行すると、プラグイン名.value [値]を標準出力します。
fpstatus -tにより出力される数値をecho出力で組み合わせました。
echo fplug_temp.value `/usr/local/bin/fpstatus -t`
fpstatus側でfplug_temp.valueまで出力していないのは、プラグイン名の自由度を優先したためです。
# ./fplug_temp
fplug_temp.value 24.0
fplug_temp.value 24.0
温度監視用plugin、fplug_tempは以下の様に記述しました。
#!/bin/sh
# -*- sh -*-
: << =cut
=head1 NAME
fplug_temp - Plugin to temperature at fplug
=head1 NOTES
Especially the average and max values on the bigger graphs (yearly) can be interesting.
=head1 AUTHOR
Contributed by Toshiya Goto
=head1 LICENSE
Unknown license
=head1 MAGIC MARKERS
#%# family=auto
#%# capabilities=autoconf
=cut
. $MUNIN_LIBDIR/plugins/plugin.sh
if [ "$1" = "autoconf" ]; then
echo yes
exit 0
fi
if [ "$1" = "config" ]; then
echo 'graph_title fplug_temperature'
echo 'graph_args --base 1000 -l 0 '
echo 'graph_scale no'
echo 'graph_vlabel temperature'
echo 'graph_category fplug'
echo 'fplug_temp.label fplug_temp'
echo 'fplug_temp.draw LINE2'
print_warning fplug_temp
print_critical fplug_temp
exit 0
fi
echo fplug_temp.value `/usr/local/bin/fpstatus -t`
上記のpluginを/usr/share/munin/pluginsの下にコピーします。
同様に、githubから取得した他のプラグインもコピーしてください。
obsa6:/usr/share/munin/plugins# ls -la fplug_*
-rwxr-xr-x 1 root root 808 Mar 1 18:51 fplug_humid
-rwxr-xr-x 1 root root 815 Mar 1 18:53 fplug_illum
-rwxr-xr-x 1 root root 812 Mar 1 18:55 fplug_rwatt
-rwxr-xr-x 1 root root 807 Mar 1 18:35 fplug_temp
-rwxr-xr-x 1 root root 808 Mar 1 18:51 fplug_humid
-rwxr-xr-x 1 root root 815 Mar 1 18:53 fplug_illum
-rwxr-xr-x 1 root root 812 Mar 1 18:55 fplug_rwatt
-rwxr-xr-x 1 root root 807 Mar 1 18:35 fplug_temp
有効にしたいpluginを/etc/munin/pluginsの下にシンボリックリンクします。
obsa6:/etc/munin/plugins# ls -ls fp*
0 lrwxrwxrwx 1 root root 36 Mar 1 18:56 fplug_humid -> /usr/share/munin/plugins/fplug_humid
0 lrwxrwxrwx 1 root root 36 Mar 1 18:56 fplug_illum -> /usr/share/munin/plugins/fplug_illum
0 lrwxrwxrwx 1 root root 36 Mar 1 18:56 fplug_rwatt -> /usr/share/munin/plugins/fplug_rwatt
0 lrwxrwxrwx 1 root root 35 Mar 1 18:42 fplug_temp -> /usr/share/munin/plugins/fplug_temp
muninをrestartします。
# /etc/init.d/munin-node restart
pluginが正常に動作しているかどうかは、/var/log/munin/の下のログを確認して下さい。
# tail /var/log/munin/munin-update.log
2013/03/04 11:35:10 [INFO] Reaping Munin::Master::UpdateWorker<localdomain;localhost.localdomain>. Exit value/signal: 0/0
2013/03/04 11:35:10 [INFO]: Munin-update finished (5.86 sec)
2013/03/04 11:40:04 Opened log file
2013/03/04 11:40:04 [INFO]: Starting munin-update
2013/03/04 11:40:10 [INFO] Reaping Munin::Master::UpdateWorker<localdomain;localhost.localdomain>. Exit value/signal: 0/0
2013/03/04 11:40:10 [INFO]: Munin-update finished (5.80 sec)
2013/03/04 11:45:04 Opened log file
2013/03/04 11:45:04 [INFO]: Starting munin-update
2013/03/04 11:45:10 [INFO] Reaping Munin::Master::UpdateWorker<localdomain;localhost.localdomain>. Exit value/signal: 0/0
2013/03/04 11:45:10 [INFO]: Munin-update finished (5.80 sec)
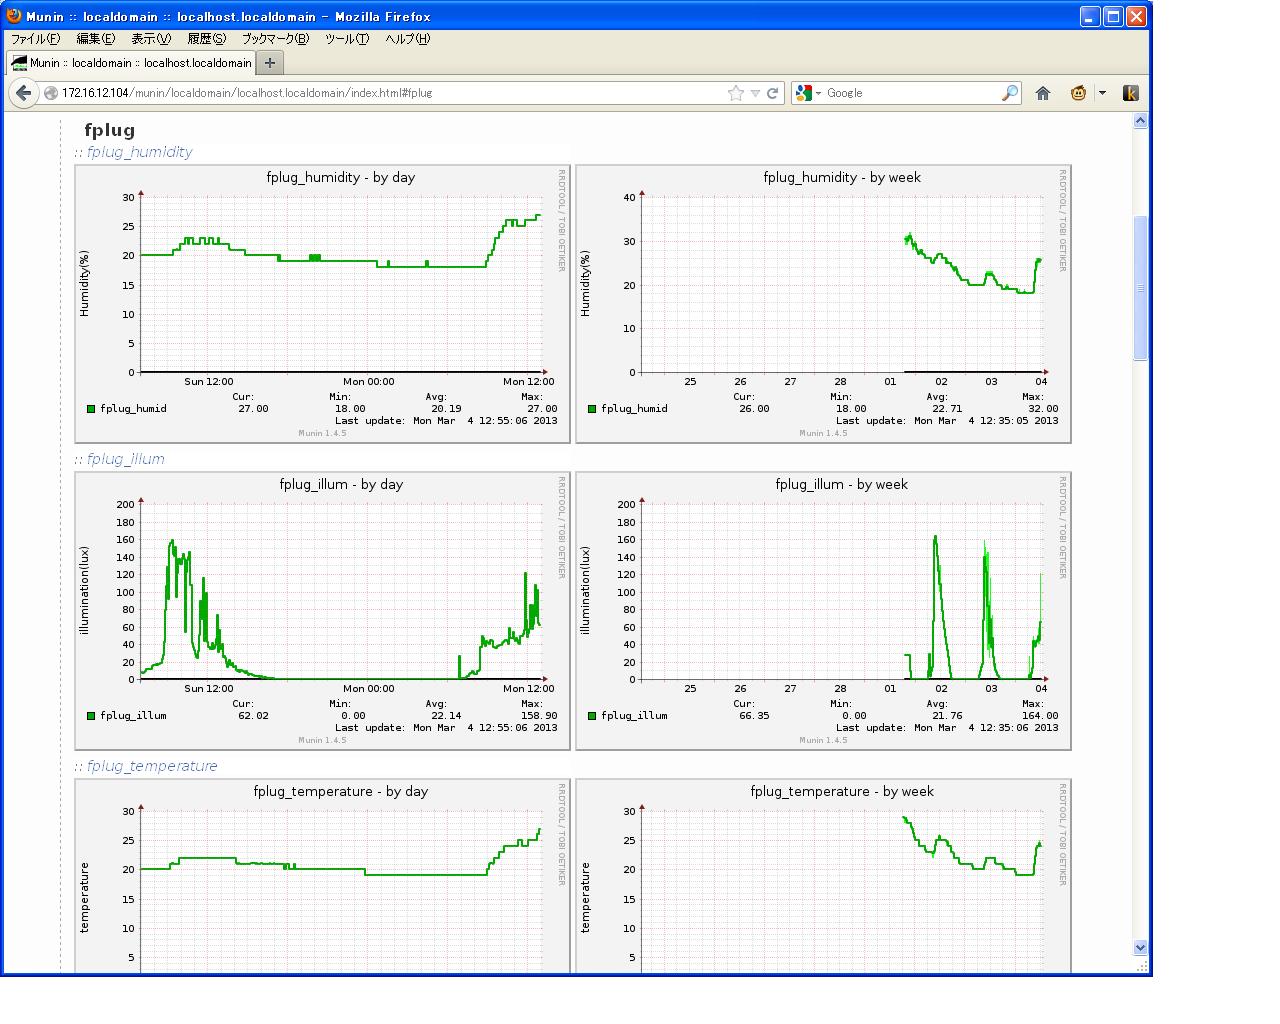
・使用方法
Webブラウザにて、
http://<muninを実行しているサーバのアドレス>/munin
にアクセスすることにより、muninのトップメニューが表示されます。
対象となるサーバおよび項目をクリックすることにより、監視対象の状態がグラフ表示されます。

<munin Overview画面>

<munin fplugプラグインのグラフ表示例>

<参考: munin 2.0による fplugプラグインのWebUI>
今回は、単純なデータハンドリングのテスト、およびWebモニタリングツールへのplugin実装を行ってみました。
電力監視に関してはリアルタイム消費電力をmuninの巡回時間毎に取得しているだけであり、ピーク管理のみとなります。
積算電力の取得をはじめ、F-PLUGの持つより高度なデータオペレーションについてお考えの方は、当blog担当までご相談下さい。
0 件のコメント:
コメントを投稿