OpenPNEは、オープンソースのSNS運用ソフトウェア群であり、株式会社手嶋屋さんを中心にOpenPNE Projectとして開発が続けられています。
公式サイトは、以下になります。
今回は、OpenBlocksAX3へのOpenPNE3.8.0の導入その1として、apache2+php5+mysqlの導入および、パッケージ展開、初期インストール、およびユーザ画面、管理画面の表示までの動作検証を行います。
OBDN技術ブログによる動作検証は、該当するソフトウェアの動作を保証およびサポートを行うものではありません。
内容に関するご指摘などありましたら、ブログ記事の担当までご連絡下さい。
<検証環境>
OpenBlocks AX3/4 Debian 6.0 kernel: 3.0.6
1.apache2の導入
・apache2パッケージのインストール
apache2-mpm-preforkを使ってみました。
# aptitude install apache2-mpm-prefork
インストールのみで起動します。
・mod_rewriteを有効にする
# a2enmod rewrite
2.phpの導入と設定
# aptitude install php5 php5-gd php-pear php5-mysql
・php.iniの設定
/etc/php5/apache2/php.iniを編集し、mbstringを有効にして下さい。
[mbstring]
; language for internal character representation.
; http://php.net/mbstring.language
mbstring.language = Japanese
; internal/script encoding.
; Some encoding cannot work as internal encoding.
; (e.g. SJIS, BIG5, ISO-2022-*)
; http://php.net/mbstring.internal-encoding
mbstring.internal_encoding = UTF-8
; http input encoding.
; http://php.net/mbstring.http-input
mbstring.http_input = auto
; http output encoding. mb_output_handler must be
; registered as output buffer to function
; http://php.net/mbstring.http-output
mbstring.http_output = UTF-8
; enable automatic encoding translation according to
; mbstring.internal_encoding setting. Input chars are
; converted to internal encoding by setting this to On.
; Note: Do _not_ use automatic encoding translation for
; portable libs/applications.
; http://php.net/mbstring.encoding-translation
mbstring.encoding_translation = on
; automatic encoding detection order.
; auto means
; http://php.net/mbstring.detect-order
mbstring.detect_order = auto
; substitute_character used when character cannot be converted
; one from another
; http://php.net/mbstring.substitute-character
mbstring.substitute_character = none;
; overload(replace) single byte functions by mbstring functions.
; mail(), ereg(), etc are overloaded by mb_send_mail(), mb_ereg(),
; etc. Possible values are 0,1,2,4 or combination of them.
; For example, 7 for overload everything.
; 0: No overload
; 1: Overload mail() function
; 2: Overload str*() functions
; 4: Overload ereg*() functions
; http://php.net/mbstring.func-overload
mbstring.func_overload = 0
3.mysqlの導入
# aptitude install mysql-server
インストール時にMySQLを管理するrootユーザのパスワードを聞かれるため、予め決めておく必要があります。
・動作確認
# mysql -u root -p
mysql> show databases;
+--------------------+
| Database |
+--------------------+
| information_schema |
| mysql |
+--------------------+
2 rows in set (0.00 sec)
mysql>
4.OpenPNEパッケージのダウンロードと展開
公式ページからOpenPNE3.8.0パッケージをダウンロードします。
(パッケージはgithubにあります)
パッケージはzipパッケージとなっており、unzipにより展開します。
ファイルの配置に関しては、上記githubのページより、
OpenPNE3 / doc / ja / OpenPNE3_Setup_Guide.txt
を開いて確認してください。
パッケージのzipファイルを/tmpに置いた場合は以下の手順となります。
# unzip openpne-OpenPNE3-OpenPNE-3.8.0-0-g8c3a808.zip
# cp -r /tmp/openpne-OpenPNE3-8c3a808 /usr/local/
# cd /usr/local/
# ln -s openpne-OpenPNE3-8c3a808 OpenPNE
# chgrp www-data -R openpne-OpenPNE3-8c3a808
# chmod g+w -R openpne-OpenPNE3-8c3a808
5. OpenPNEパッケージのインストール
上記OpenPNE3_Setup_Guide.txtに従い作業します。
/usr/local/下にパッケージを置いた場合
・設定ファイルのコピー
# cd /usr/local/OpenPNE3
# cp config/ProjectConfiguration.class.php.sample config/ProjectConfiguration.class.php
# cp config/OpenPNE.yml.sample config/OpenPNE.yml
・インストールコマンドの実行
# ./symfony openpne:install
openpne:install コマンドを実行すると、はじめに、以下の事項の入力を求められます。
* 使用する DBMS (mysql, pgsql, sqlite から選択。ただし mysql
* 以外は未サポート)
* データベース名
* データベースへの接続用ユーザ名
* データベースへの接続用パスワード(未入力可)
* データベースサーバのホスト名(localhost など)
* データベースサーバのポート番号(未入力可)
* (DBMS に MySQL を選択し、サーバホスト名に localhost
* を指定した場合)使用するソケットへのパス(未入力可)
以上の事項について入力をおこなうと、インストール作業が自動でおこなわれます。
また、これらの入力事項をコマンドの引数としてデータベースの設定値を指定してインストールすることも可能です。
以下は使用例ですので、設定値は適宜変更してください。
# ./symfony openpne:fast-install --dbms=mysql --dbuser=username --dbpassword=password --dbhost=localhost --dbport=10 --dbname=databasename
・開発環境用ファイルを削除
# ./symfony project:clear-controllers
・mod_rewrite の設定
web/.htaccess の RewriteBase を各自の環境にあわせて編集して下さい。
RewriteBase /
6. apache2の設定
ご利用の環境に合わせてapacheを設定します。
/etc/apache2/conf.d/localの一部を以下の様に変更しました。
DocumentRoot /usr/local/OpenPNE/web/
DirectoryIndex index.php
Options Indexes FollowSymLinks MultiViews
AllowOverride All
Order allow,deny
allow from all
</Directory>
7.動作確認
ブラウザからアクセス(ユーザ画面)
(1) http://<サーバのURLもしくはIPアドレス>/index.php にアクセス
(2) ログインフォームに sns@example.com / password と入力し、ログインできるかどうか確認
※メールアドレスとパスワードはログイン後に必ず変更してください

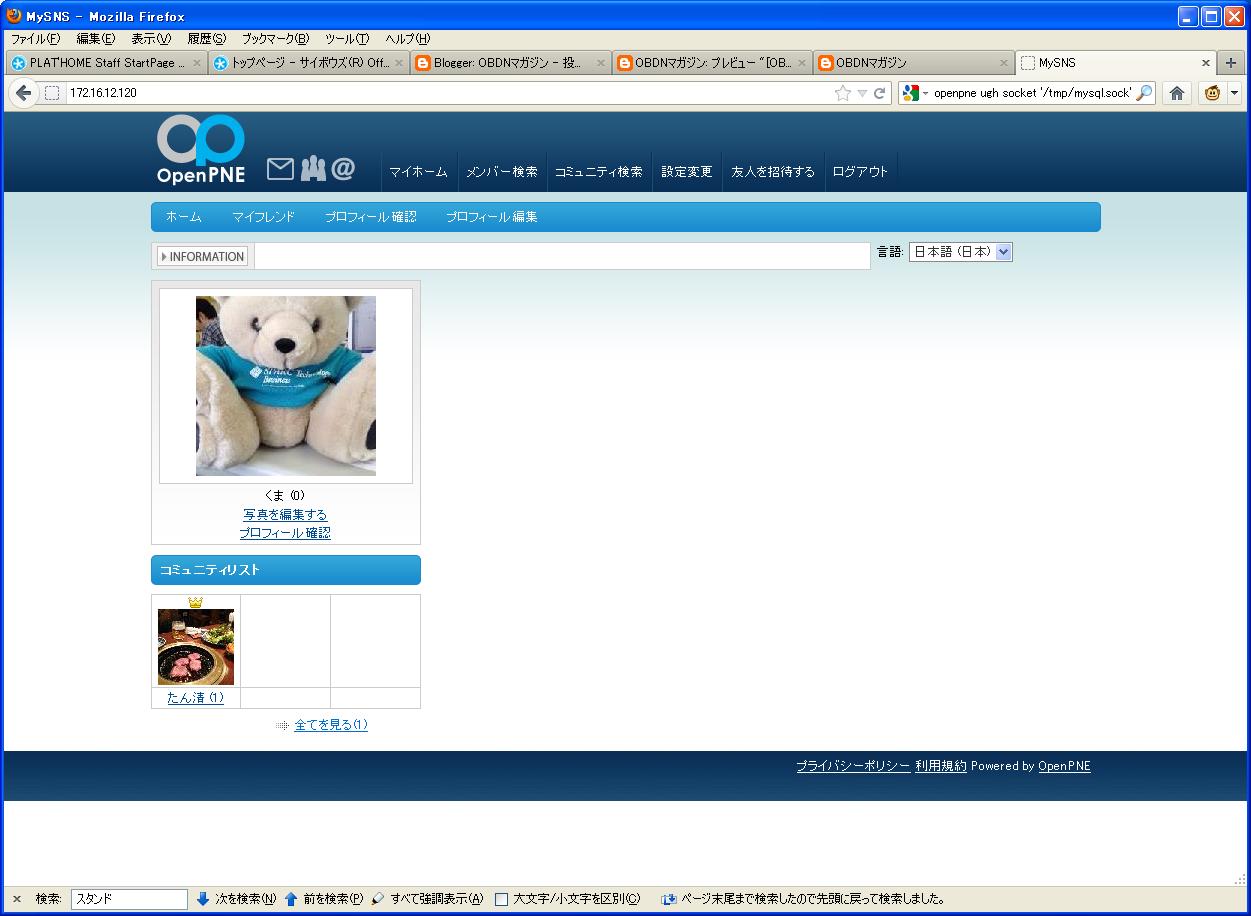
写真やプロフィールの変更を行ってみます。
・ブラウザからアクセス(管理画面)
(1) http://<サーバのURLもしくはIPアドレス>/pc_backend.php にアクセス
(2) ログインフォームに admin / password と入力し、ログインできるかどうか確認
※メールアドレスとパスワードはログイン後に必ず変更してください

以上で、OpenPNEの導入から、ユーザ画面、管理画面までの簡単な動作確認を行いました。
次回、postfix回りやcron回りの設定を含む全体の運用についてご報告出来ればと思います。
0 件のコメント:
コメントを投稿